環境構築
Webスクレイピングを行うためにはまず、環境構築が必要です。 今回は
selenium
を使用していきます。また、画像を扱う上で必要になってくるPillow
のインストールの仕方もお伝えします。
Seleniumのインストールと準備
pip3 install selenium もしくは、pip install selenium
とターミナル等で入力しインストールしてください。※Anacondaでインストールしている場合は、
python -m pip install selenium
の方が安全かもしれません。動かしてみる(Firefox)
こちらからFirefoxをダウンロードしておきましょう。次にGoogleChromeもお伝えするので、Firefoxでなくても大丈夫です。
まずは、seleniumを使ってみましょう。
In [1]:
# seleniumの読み込み
from selenium import webdriver

# 一時停止用の標準ライブラリの読み込み
from time import sleep
それでは、FirefoxのWebブラウザを立ち上げましょう。
In [2]:
# firefoxを使いますよと宣言
browser = webdriver.Firefox()
---------------------------------------------------------------------------
FileNotFoundError                         Traceback (most recent call last)
/usr/local/lib/python3.7/site-packages/selenium/webdriver/common/service.py in start(self)
     75                                             stderr=self.log_file,
---> 76                                             stdin=PIPE)
     77         except TypeError:

/usr/local/Cellar/python/3.7.0/Frameworks/Python.framework/Versions/3.7/lib/python3.7/subprocess.py in __init__(self, args, bufsize, executable, stdin, stdout, stderr, preexec_fn, close_fds, shell, cwd, env, universal_newlines, startupinfo, creationflags, restore_signals, start_new_session, pass_fds, encoding, errors, text)
    755                                 errread, errwrite,
--> 756                                 restore_signals, start_new_session)
    757         except:

/usr/local/Cellar/python/3.7.0/Frameworks/Python.framework/Versions/3.7/lib/python3.7/subprocess.py in _execute_child(self, args, executable, preexec_fn, close_fds, pass_fds, cwd, env, startupinfo, creationflags, shell, p2cread, p2cwrite, c2pread, c2pwrite, errread, errwrite, restore_signals, start_new_session)
   1498                             err_msg += ': ' + repr(err_filename)
-> 1499                     raise child_exception_type(errno_num, err_msg, err_filename)
   1500                 raise child_exception_type(err_msg)

FileNotFoundError: [Errno 2] No such file or directory: 'geckodriver': 'geckodriver'

During handling of the above exception, another exception occurred:

WebDriverException                        Traceback (most recent call last)
<ipython-input-2-af154e14a3fd> in <module>()
      1 # firefoxを使いますよと宣言
----> 2 browser = webdriver.Firefox()

/usr/local/lib/python3.7/site-packages/selenium/webdriver/firefox/webdriver.py in __init__(self, firefox_profile, firefox_binary, timeout, capabilities, proxy, executable_path, options, service_log_path, firefox_options, service_args, desired_capabilities, log_path, keep_alive)
    162                 service_args=service_args,
    163                 log_path=service_log_path)
--> 164             self.service.start()
    165
    166             capabilities.update(options.to_capabilities())

/usr/local/lib/python3.7/site-packages/selenium/webdriver/common/service.py in start(self)
     81                 raise WebDriverException(
     82                     "'%s' executable needs to be in PATH. %s" % (
---> 83                         os.path.basename(self.path), self.start_error_message)
     84                 )
     85             elif err.errno == errno.EACCES:

WebDriverException: Message: 'geckodriver' executable needs to be in PATH.
Message: 'geckodriver' executable needs to be in PATH.
というエラーがおそらく出ると思います。これは
geckodriver
が入ってませんよというエラーになります。Macの方は下記コマンドでインストールしてください。Macの方
brew install geckodriver
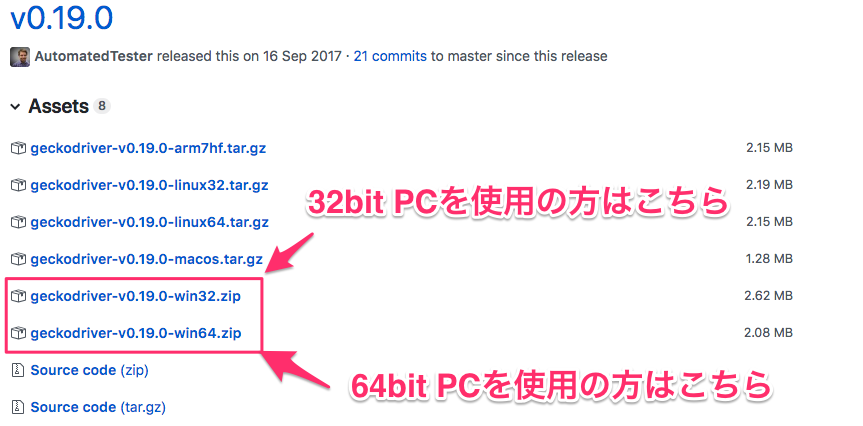
Windowsの方
Windowsの方は少し面倒ですが、こちらから
geckodriver をダウンロード&展開して、そのフォルダの中の
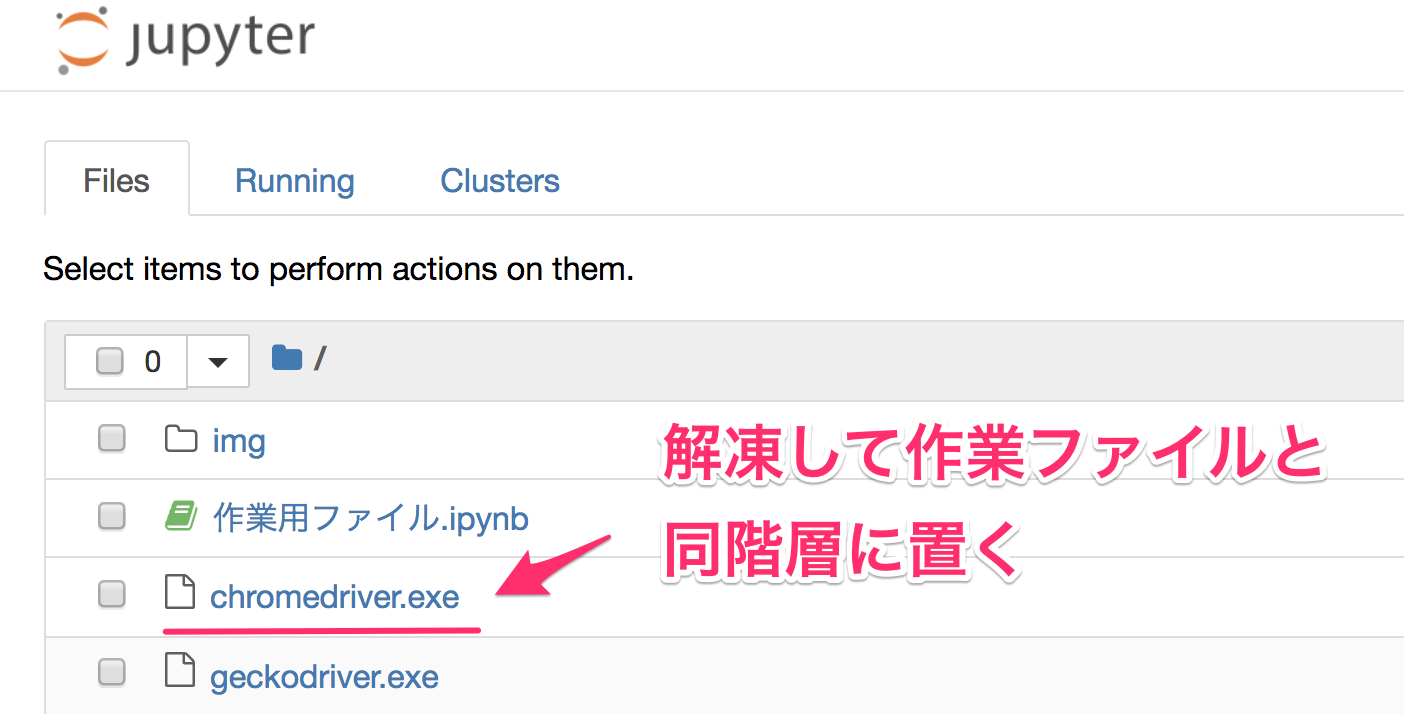
geckodriver.exe を作業ファイルと同じ階層に置きましょう。
以下のように作業しているファイルと同じ階層に回答した geckodriver.exe
を置いてください。
geckodriver
を準備できたところで先程のコードをもう一度実行してみよう。
In [3]:
# Macの方
browser = webdriver.Firefox()

# Windowsの方
browser = webdriver.Firefox('geckodriver.exe')
おそらくFirefoxが立ち上がったのではないでしょうか。このようにたったの一行でWebブラウザを起動することができます。
Pillow
画像を扱うためのライブラリである Pillow をインストールしましょう。
pip3 install Pillow
もしくは、
pip install Pillow
でインストールしましょう。